
Dear readers,
In this article, I'm going to explain how to make a home automation project, in which you can control your household appliances remotely by using your smartphone.

The part you'll require to build the project:
1. Arduino Uno

2. 4 channel relay module

3. HC-05 Bluetooth module

4. 12v dc adapter

5. 4x3 inch general PCB

6. 4 socket extension box

7. Laptop with Arduino IDE ( To upload program in Arduino)


Program for Arduino:
#define relay1 A5 //connect relay1 to pin A5
#define relay2 A4 //connect relay2 to pin A4
#define relay3 A3 //connect relay3 to pin A3
#define relay4 A2 //connect relay4 to pin A2
void setup()
{
Serial.begin(9600); //set rate for communicating with phone
pinMode(relay1, OUTPUT); //set relay1 as an output
pinMode(relay2, OUTPUT); //set relay2 as an output
pinMode(relay3, OUTPUT); //set relay1 as an output
pinMode(relay4, OUTPUT); //set relay2 as an output
digitalWrite(relay1, HIGH); //switch relay1 off
digitalWrite(relay2, HIGH); //switch relay2 off
digitalWrite(relay3, HIGH); //switch relay1 off
digitalWrite(relay4, HIGH); //switch relay2 off
}
void loop()
{
if (Serial.available() > 0) //check if there are available bytes to read
{
delay(5); //delay to make it stable
c = Serial.read(); //conduct a serial read
if(c == 'A')
/*A is the value you send through your mobile, you can change, whatever you feel :)*/
{
digitalWrite(relay1, HIGH);
Serial.println("Appliance 1 is OFF");
}
else if(c == 'a')
/*a is the value you send through your mobile, you can change, whatever you feel :)*/
{
digitalWrite(relay1, LOW);
Serial.println("Appliance 1 is ON");
}
else if(c == 'B')
/*B is the value you send through your mobile, you can change, whatever you feel :)*/
{
digitalWrite(relay2, HIGH);
Serial.println("Appliance 2 is OFF");
}
else if(c == 'b')
/*b is the value you send through your mobile, you can change, whatever you feel :)*/
{
digitalWrite(relay2, LOW);
Serial.println("Appliance 2 is ON");
}
else if(c == 'C')
/*C is the value you send through your mobile, you can change, whatever you feel :)*/
{
digitalWrite(relay3, HIGH);
Serial.println("Appliance 3 is OFF");
}
else if(c == 'c')
/*c is the value you send through your mobile, you can change, whatever you feel :)*/
Serial.println("Appliance 3 is ON");
}
else if(c == 'D')
/*D is the value you send through your mobile, you can change, whatever you feel :)*/
Serial.println("Appliance 4 is OFF");
}
else if(c == 'd')
/*d is the value you send through your mobile, you can change, whatever you feel :)*/
Serial.println("Appliance 4 is ON");
}
}
}
/*****************************************************/
Download the below app and create the interface you like:
Complete video with the demonstration,
In this article, I'm going to explain how to make a home automation project, in which you can control your household appliances remotely by using your smartphone.

The part you'll require to build the project:
1. Arduino Uno
2. 4 channel relay module
3. HC-05 Bluetooth module
4. 12v dc adapter
5. 4x3 inch general PCB
6. 4 socket extension box

7. Laptop with Arduino IDE ( To upload program in Arduino)
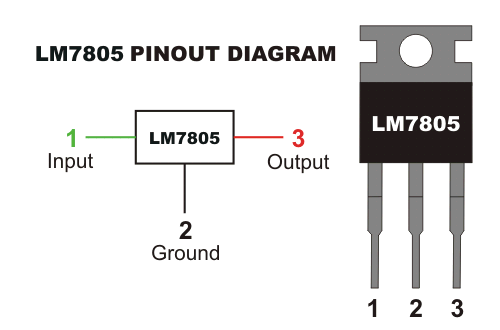
8. 7805 5v voltage regulator
The circuit diagram and connections of the project:
!Caution!
Don't connect AC source, unless you test it with the DC adapter
Circuit Diagram:

Actual module connections :

Printed layot for printing:

Program for Arduino:
NOTE: just copy the below link and upload on arduino
/*****************************************************/
char c;#define relay1 A5 //connect relay1 to pin A5
#define relay2 A4 //connect relay2 to pin A4
#define relay3 A3 //connect relay3 to pin A3
#define relay4 A2 //connect relay4 to pin A2
void setup()
{
Serial.begin(9600); //set rate for communicating with phone
pinMode(relay1, OUTPUT); //set relay1 as an output
pinMode(relay2, OUTPUT); //set relay2 as an output
pinMode(relay3, OUTPUT); //set relay1 as an output
pinMode(relay4, OUTPUT); //set relay2 as an output
digitalWrite(relay1, HIGH); //switch relay1 off
digitalWrite(relay2, HIGH); //switch relay2 off
digitalWrite(relay3, HIGH); //switch relay1 off
digitalWrite(relay4, HIGH); //switch relay2 off
}
void loop()
{
if (Serial.available() > 0) //check if there are available bytes to read
{
delay(5); //delay to make it stable
c = Serial.read(); //conduct a serial read
if(c == 'A')
/*A is the value you send through your mobile, you can change, whatever you feel :)*/
{
digitalWrite(relay1, HIGH);
Serial.println("Appliance 1 is OFF");
}
else if(c == 'a')
/*a is the value you send through your mobile, you can change, whatever you feel :)*/
{
digitalWrite(relay1, LOW);
Serial.println("Appliance 1 is ON");
}
else if(c == 'B')
/*B is the value you send through your mobile, you can change, whatever you feel :)*/
{
digitalWrite(relay2, HIGH);
Serial.println("Appliance 2 is OFF");
}
else if(c == 'b')
/*b is the value you send through your mobile, you can change, whatever you feel :)*/
{
digitalWrite(relay2, LOW);
Serial.println("Appliance 2 is ON");
}
else if(c == 'C')
/*C is the value you send through your mobile, you can change, whatever you feel :)*/
{
digitalWrite(relay3, HIGH);
Serial.println("Appliance 3 is OFF");
}
else if(c == 'c')
/*c is the value you send through your mobile, you can change, whatever you feel :)*/
{
digitalWrite(relay3, LOW);Serial.println("Appliance 3 is ON");
}
else if(c == 'D')
/*D is the value you send through your mobile, you can change, whatever you feel :)*/
{
digitalWrite(relay4, HIGH);Serial.println("Appliance 4 is OFF");
}
else if(c == 'd')
/*d is the value you send through your mobile, you can change, whatever you feel :)*/
{
digitalWrite(relay4, LOW);Serial.println("Appliance 4 is ON");
}
}
}
/*****************************************************/
Download the below app and create the interface you like:
Note: assign the given on/off values same as mentioned in the program otherwise it won't work

Complete video with the demonstration,
how to build and how it works
Troubleshooting guide
1. Check all the connections according to the circuit
2. Correctly connect the power supply and DC adapter
3. Check whether the Bluetooth is connected or not
4. Check all assigned vales are same as mentioned in the programing code for both on/off statements
4. Check all assigned vales are same as mentioned in the programing code for both on/off statements
Still, you're facing any issue feel free to contact us:
*
We'll be glad to entertain you, rest stay healthy stay safe!
JAI * HIND


0 Comments